Finished: Niizo Hobo Canvas Bag!

Hi, guys! Hope you all had a lovely weekend, especially for those of you in the US and the UK with an extra day off, yay! OK, it’s a well-established fact on this blog that I am a bit of a bag hoarder. Taking an accessory design this past semester really didn’t help that! Once I started patterning my own bags, I really got interested in how they came together! They’re fun little experiments in design. 🙂 So when Amy Lin of Niizo invited me to try one of her kits in exchange for a review, I happily agreed. I have a new appreciation for the hard work that goes into making something both functional and attractive for daily use!

Niizo offers both PDF patterns and kits that contain the fabric and hardware to make a bag. Right now you can choose from thirteen different patterns and ten different kits; I chose the Hobo Canvas Bag in Iron Gray. If you order a kit, you receive a PDF copy of the pattern, not a hard copy, but for you PDF haters, you should know that for my bag, at least, I only needed to print out nine pages, and there was no taping required at all. Amy uses a really efficient technique where some of the pattern pieces are printed out at half- or quarter-size, so they fit on one page, and then you trace and flip them directly on the fabric to create the whole piece. I really liked this!

I really enjoyed sewing this bag! There are 46 steps in the pattern instructions, so it took a while, but it was really rewarding to make something with so much detail. The bag is fully lined (with a nylon-y fabric, perfect for wiping down when you realize that your bagel has gotten loose in your bag, shedding sesame seeds all over the place, which is a situation I would NEVER find myself in OOOOOPS), with regular pockets, bellows pockets, and a zippered inside pouch made from a fun contrast fabric. The strap is adjustable and backed with webbing for strength and durability. I learned how to apply a magnetic snap closure and a screw-back button for the tab closure, which I really liked. There’s just something about special hardware that makes a project feel more professional! I also learned how to do a double-stitch for the leather details by watching Amy’s YouTube video, something that I will definitely use for future projects. This is the third bag I’ve made this year (previous projects were a simple handbag for a class assignment and my Sprout Patterns x Portside duffel). I was feeling a bit deflated after I finished the bag for my class- it’s just very homemade, in a bad way! But my confidence is restored a bit after this project! It’s been a while since I made something that really made me feel like I was learning at every step of the process.

The pricing feels very fair to me. The kit I used retails at $49, which is $5 more than the Sprout bag project. But the Niizo kit includes everything you need to make the bag (except the thread), instead of just the main fabric and the PDF. The hardware can really be pricey, and if you are scouring the internet to find all the bits and bobs, it’s time-consuming, too. So if you like the Niizo aesthetic, it’s pretty cost-effective to just buy a kit. Here’s the full rundown of what’s included:

  • main fabric
  • lining fabric
  • contrast fabric
  • fusible batting
  • zipper
  • d-rings
  • swivel bolt hooks
  • slide buckle
  • brass loop
  • cotton webbing
  • magnetic snap set
  • button stud screwback set
  • leather details
  • waxed thread
  • leather needles

I really like Amy’s aesthetic- her bags are very clean and minimal, and the fabric choices she offers cover the basics (grey, navy, etc.) with a few additions (mustard, bright pink, etc). And her instructions make sense, even when I wasn’t sure what I was doing. The only tip I would offer is to not try to iron the lining- I gave mine a test and it definitely started stinking the minute I hit it with some heat! Luckily you never really run into any issues with not being able to press it- the seams are all topstitched down.

If you’re interested in making a bag of your own, Amy is running a special quiz sale this week, from May 30th-June 2nd. Hop on over to her Instagram account and answer the question of the day… if you get the question right, you’ll get a coupon code worth 5-12% off! I have to warn you, though- you might have a really hard time choosing a bag! It took me DAYS to decide on one! There are a couple of really cool backpack options, which I couldn’t justify as I already have one, but they would be a really great way to level up your sewing skills and add some more handmades to your daily life! Finally, the kits would make a great gift for a person who sews, so maybe leave a few hints for your loved ones if your birthday is coming up! 😉

Alright, guys, what’s the most recent thing project you’ve completed that’s left you feeling like you really upped your skills? What are you working on these days?

Finished: Skógafjall Sweater!

Oh boy, this one was a queue-hopper! This pattern was released for Tolt Yarn and Wool‘s annual Icelandic Wool Month, and the second I saw it, I knew it would be next on my needles! I was busy finishing up my Bronwyn sweater during the month of March, so I was too late too join in on the Icelandic Wool Month fun, but I still appreciated the inspiration.

The pattern is Skógafjall (Ravelry page here) by Dianna Walla, a designer I’ve long admired (you can read her thoughts about the design here). It’s written for Ístex Léttlopi, which I’ve used before for a sweater and a handful of hats (the Moon Sprites pattern, also by Dianna, is a great one for gift giving, although Léttlopi may be a bit scratchy for non-wool-enthusiasts). I love the tree motif, and it was perfect timing because I’d just been thinking that I’d love to have a green sweater.

I used the colorway from the sample, pine heather, for the body, and I also used oatmeal heather (leftover from my first Léttlopi sweater) and hazel heather for the yoke.

Léttlopi has many advantages, chief among them being its relatively low cost and its speed- aran weight knits up so quickly, especially in a seamless, stockinette sweater! I knit this in a month, mostly during weekend evenings. I can never seem to get recommended gauge in the yarn (4.5 stitches/inch, in this case), though, so I cast on for the size 35.5″, which gave me 37.5″-ish at my gauge for about 3″ of ease. This worked out as anticipated, yay!

One of the nicest things about this pattern is the short rows for shaping. I’m not too familiar with them, so I linked to a few tutorials that I found helpful on my Ravelry project page. The effect of the short rows is to raise the back neckline, which prevents the sweater from riding up at the neck, something that I’ve noticed a bit with my previous lopipeysa. This sweater fits nicely and while it’s not too fitted, I’m not swamped in it and it doesn’t seem quite as unisex as my horse sweater.

The only thing I’m not super happy with is my color scheme for the yoke. I’d intended to swap the background and accent colors for the yoke, but there wasn’t enough contrast between the green and the brown. This isn’t exactly what I had in mind, which is probably why it’s a good idea to swatch your colorwork before starting out. But even if I had, I probably would have cheaped out and just used the yarn I already had instead of ordering different colors, so I guess I would have had the same results!

But overall, I’m happy with the sweater and I’ll definitely wear it lots this winter. It’s super drafty in my house, so I appreciate thick layers in the colder months!

Alright, friends, what are you knitting these days?


Brooklyn Tweed Bronwyn Pullover!

Hello, friends! Here I am, at the advent of spring, with a worsted-weight wool sweater, just in time to pack it away until October! What can I say? I’ve never been good at seasonally-appropriate crafting! 😀

Brooklyn Tweed Bronwyn Pullover | Ginger Makes

The Details

Pattern: Bronwyn, by Melissa Wehrle, for Brooklyn Tweed (here it is on Ravelry)

Yarn: Shelter in Truffle Hunt (just under 9 skeins)

Brooklyn Tweed Bronwyn Pullover | Ginger Makes

Even though I won’t get to wear it for a while, this sweater has me AMPED! I love it! I really think it’s the best fit that I’ve gotten to date in a handmade sweater- a straight cut with a bit of ease through the body, which I like, and a slim fit through the shoulders and sleeves for nice balance. I didn’t make any modifications for fit; it’s all due to Melissa’s good design.

Brooklyn Tweed Bronwyn Pullover | Ginger Makes

I purchased this yarn a while ago with a plan to make a Stonecutter, but as soon as Bronwyn was released, I knew that I wanted to use it for her! I’ll make a Stonecutter one day, I promise. 🙂 The colorway is really gorgeous- it’s brown/grey, with little flecks of blue throughout. It looks brown in warm light and grey in cool light, and pairs beautifully with denim, which is perfect for this jeans lover!

Brooklyn Tweed Bronwyn Pullover | Ginger Makes

The pattern was a joy to knit. It starts with a tubular cast-on and a split hem, which look great and give a modern edge and professional touch to the sweater. Then the hems are joined and the sweater is knit circularly, bottom up, until the armscyes. Then the front and back are knit flat. The raglan sleeves are knit circularly, bottom up, and seamed to the body. I always dread seaming knits, but this was really straightforward to do and I was so excited to finish the sweater that I seamed it right away instead of my usual procrastinating for weeks/months before seaming (note: I used leftover sock yarn to seam this… I just can’t manage to do it in Shelter without the yarn snapping).

Brooklyn Tweed Bronwyn Pullover | Ginger Makes

The cable pattern is gorgeous and super intuitive- after a couple of repeats, everything just makes sense. I followed the pattern exactly, with the small exception of slipping the first stitch of each row on the hem. I seem to always have to go down a needle size to get gauge in BT patterns, and this was no exception. Everything easily blocked out to the right dimensions and the cables looked so nice after a good blocking!

Brooklyn Tweed Bronwyn Pullover | Ginger Makes

It was fun to knit a pattern written by Melissa, too. I’ve gotten to know her and knit with her a bit over the years as she lives not far from me in Queens. With this sweater joining a couple of Michele Wang sweaters in my closet, there’s a pretty heavy representation of Queens-designed knits in my closet! 🙂

Brooklyn Tweed Bronwyn Pullover | Ginger Makes
Pine cone so you know I’m a real blogger 😉

Alright, friends, what are you knitting these days? If you’re in the northern hemisphere, are you still planning hand-knitted projects, or are you moving on to other things in the anticipation of warmer weather ahead?

Sprout Patterns x Portside Duffel Bag

Hi, guys! I hope you are all well! Today I want to show you my cute new bag! Sprout Patterns approached me to see if I would try out their service and blog about the experience*. Sprout Patterns is an offshoot of Spoonflower, the site where you can choose custom designs uploaded by users or your own designs, and have them printed on fabric. Sprout partners with indie sewing pattern designers; like with Spoonflower, you can select or design your own prints, but you also select a sewing pattern and the pattern pieces are printed directly onto the fabric.

Sprout Patterns x Portside Duffel Bag | Ginger Makes

The Details

Pattern: Grainline Studio Portside Duffle (here‘s where you can make your own on Sprout)

Fabric: Linen Cotton Canvas Ultra

Prints: Sleepy Fox and Cactus Coral, both by kimsa

Lining: Mountains (Black) from the Adventure Awaits collection by Dear Stella from Fancy Tiger Crafts

Bag Hardware: D-rings, swivel bolt hooks, and cotton webbing from Pacific Trimming. Zipper from SIL Thread.

Sprout Patterns x Portside Duffel Bag | Ginger Makes

My original plan was to use my own designs, since I had developed a small portfolio for last semester’s print design class. But I found that I couldn’t stop obsessing over my own prints, changing the colors and the scale, and I just didn’t have time to be fussy, so I picked out two really fun prints from the Sprout library and forced myself to commit and move on so I could get back to homework. 🙂

Sprout Patterns x Portside Duffel Bag | Ginger Makes

So, the cool thing about Sprout is that you don’t have to mess around with paper patterns, pinning, or tracing before you cut things out- you can just cut right into the fabric and you’re good to go! The obvious downside to this is that you can’t go crazy with fit alterations because the pattern pieces are printed on the fabric. Along these lines, if you’re between sizes or a different size on top than on bottom, you can’t really do anything about that. So choosing projects that have a forgiving fit is one way to deal with this, or or you can choose a project from a pattern company with sizing that fits you pretty well right out of the envelope. I didn’t want to stress about sizing, so I decided to make a bag- that’s one way to solve that problem!

Sprout Patterns x Portside Duffel Bag | Ginger Makes

The process is pretty simple. You choose a pattern/project, and then you can select prints that you like or upload your own. You can move the prints around on the pattern pieces to center motifs that you like, and you can pick coordinating prints or solids, if you choose. Next, you select your preferred substrate from a list of options that are appropriate for your project. Each pattern piece is labeled, with notches marked and seam allowances added. Once you place the order, you receive the PDF of the pattern via email, and the printed fabric ships out a few days later. You provide your own notions, interfacing, and in this case, lining.

Sprout Patterns x Portside Duffel Bag | Ginger Makes

I selected Linen Cotton Canvas Ultra as I wanted to use natural fibers so I could press the seams easily and I’d heard that the Heavy Cotton Twill wasn’t going to be available for much longer and I didn’t want to use something that might not be around by the time I finished my project. Unfortunately, this was not the right choice! It’s way too light for a bag, so I had to underline it with some leftover canvas that I had kicking around from an upholstery project. I also interfaced each piece, as per the pattern instructions.

Even though notches are marked on the fabric, other markings aren’t included (they can’t be printed on, or they’d be visible), so unfortunately, I had to print and assemble the (included) PDF pattern so I would know where to place all the webbing. I would have rather just had instructions to measure 4″ from the side seam or whatever so I didn’t have to deal with all that paper waste. Unfortunately, by the time I’d dealt with underlining the fabric and assembling the PDF, this felt just like any other sewing project… all of the ease of cutting straight into the fashion fabric was erased.

Sprout Patterns x Portside Duffel Bag | Ginger Makes

The thing that I found super irksome was that the instructions called for prewashing the fabric, which I did, but the fabric shrank quite a bit (I can’t remember the temperature that I washed it at, but I guess I should have just line dried the fabric instead of tumbling it?). Unfortunately, the print layout on the fabric had the upper side piece printed on the grain and the lower printed on the crossgrain, and they shrank at different ratios, so when I went to sew them together, the lower side was 1″ shorter at the seamline. This turned into a real headache as I went along- the pockets don’t match up with the end panels because they were placed different directions on the grain, and the lining, which was cut from the same pattern pieces as the shell, but with pre-shrunk fabric, was considerably bigger than the outer bag. It’s not the end of the world with a bag, but I’m not certain how this would play out if you were making a garment.

Sprout Patterns x Portside Duffel Bag | Ginger Makes

The pattern itself was very straightforward to put together, and was quite fun for me. I’ve never really made a bag before, so it was cool to see how that worked. The instructions were clear and the resulting bag is super usable. I followed the instructions to a T; the only change I made was to sub out the printed bottom piece for a bit of waxed canvas I had kicking around. This seemed like it would wear better over the long run than the linen/cotton fabric… I’m pretty hard on bags, historically!

Sprout Patterns x Portside Duffel Bag | Ginger Makes

The cost seemed pretty reasonable to me for the bag- the project was complimentary to me, but it would have cost $44 in the fabric that I chose. Since the bag pattern, included when you buy the project, would cost you $14 to purchase yourself, paying $30 for custom-printed fabric doesn’t seem too terribly steep to me. Yes, it’s more than you would probably pay if you grabbed a couple of yards of fabric at the store, but for something special that’s printed to your specifications, that doesn’t seem too high. The overall cost of the bag gets a little steeper when you factor in the cost of lining, webbing, zippers, and bag hardware. I recommend shopping around a bit for these things- they really varied in price at different spots in the Garment District!

Sprout Patterns x Portside Duffel Bag | Ginger Makes

Overall, I’m really happy with the finished bag. I think if I used Sprout again in the future I would be careful with laundering as that could really change your experience, but otherwise, it’s a very user-friendly service that was a fun change of pace from my usual sewing projects. I really enjoyed making a bag, too, and would definitely recommend this pattern for gift sewing. I could see myself making a few more bags for friends and family members!

Sprout Patterns x Portside Duffel Bag | Ginger Makes

Plenty of room for all your pug’s accessories!

Alright, have you guys used Spoonflower, Sprout Patterns, or any other custom fabric service? What were your experiences like?

*I received this Sprout project free of charge. I paid for the lining/notions/hardware/etc myself and did not receive any additional compensation for the post. All opinions my own. 🙂

Grainline Cascade Duffle, aka the Coat of My Dreams!

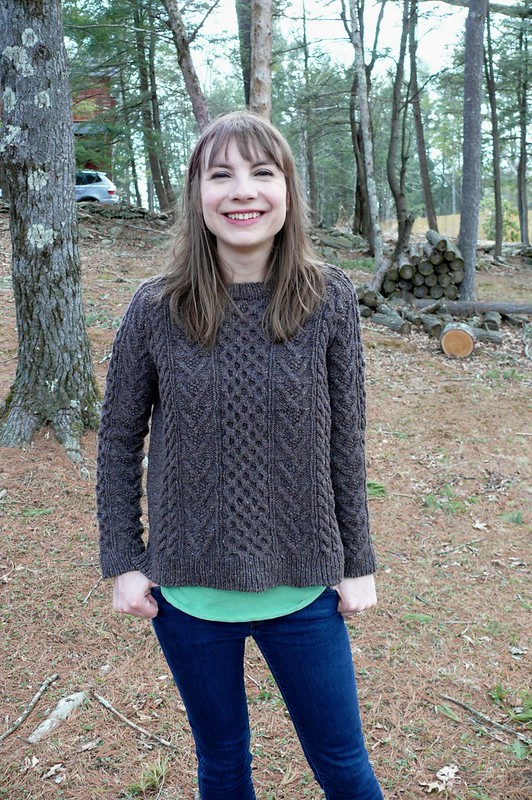
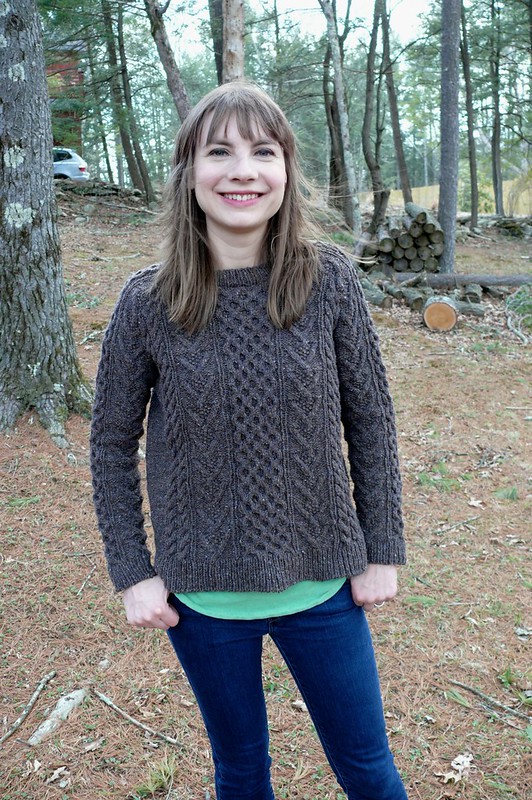
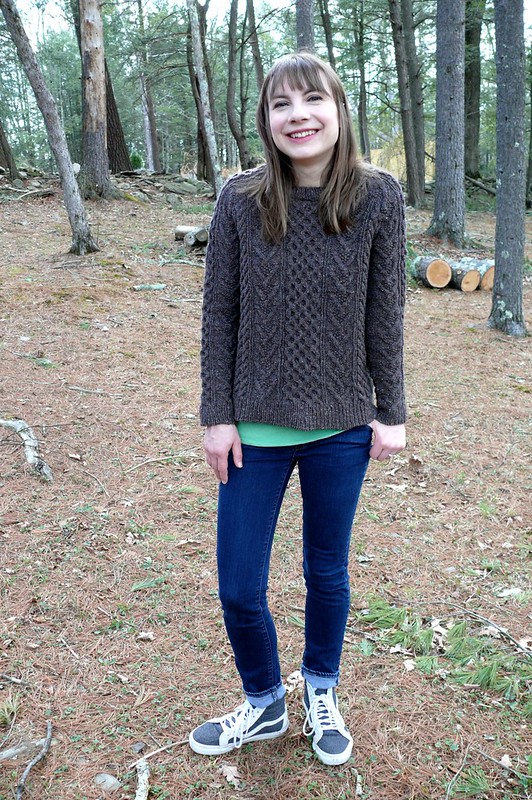
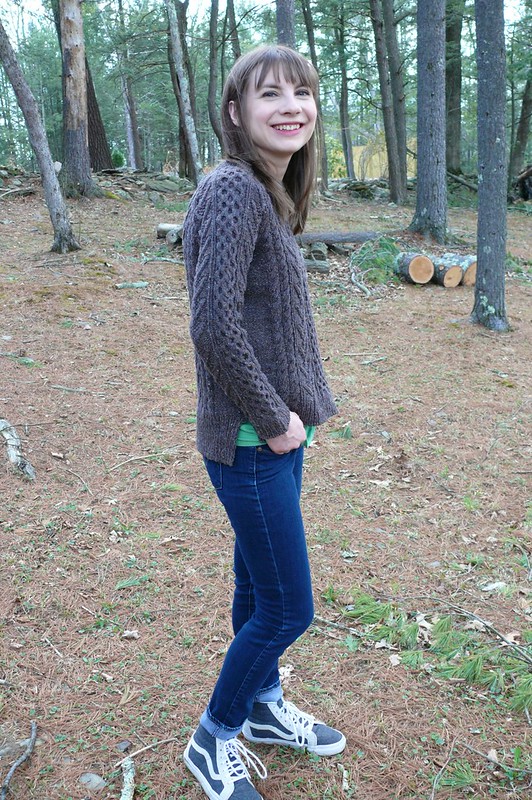
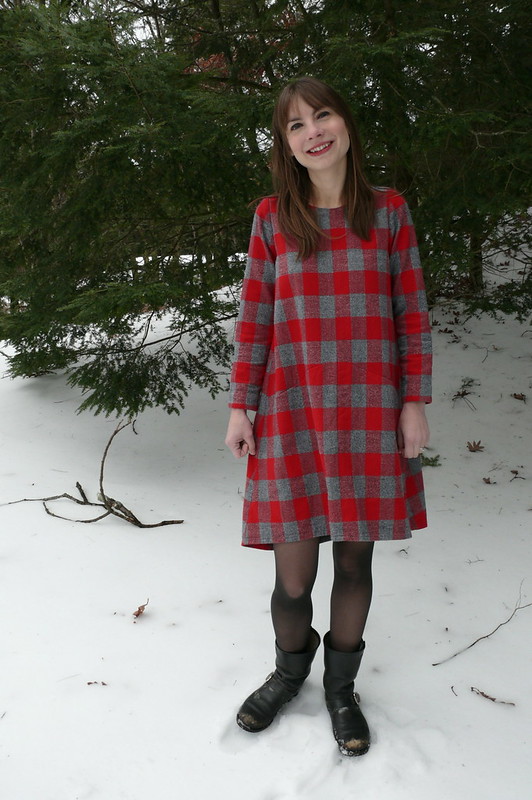
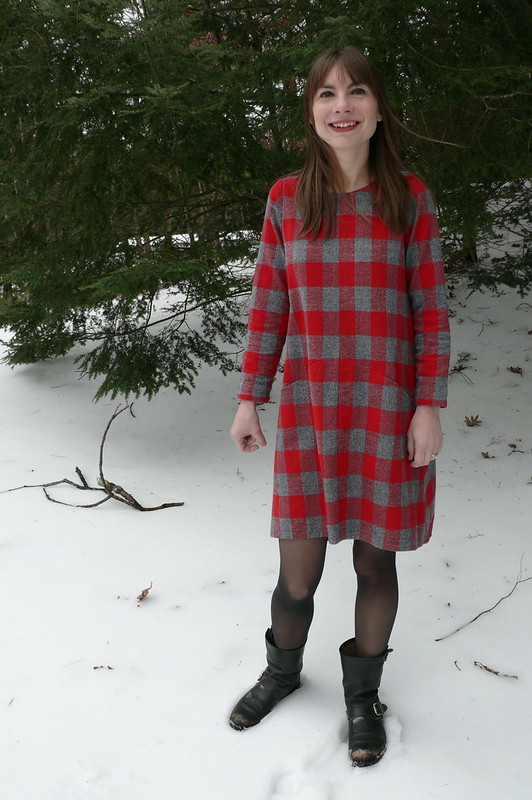
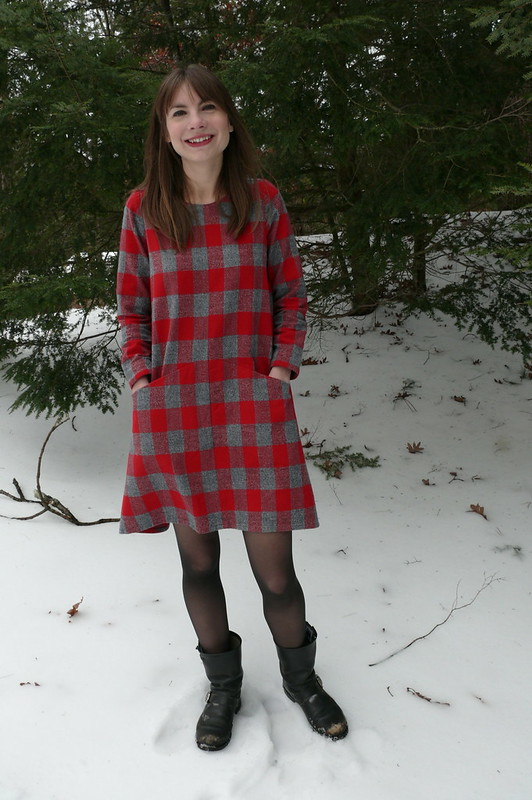
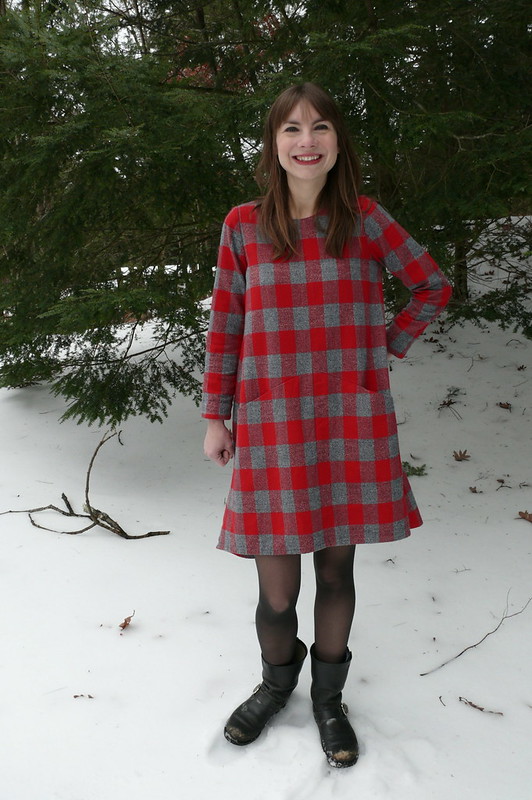
Ummmm, if you’re been around this blog at all before, you probably know that I loooooove coats. I love making them, I love wearing them, I love thinking about them! So it’s a little embarrassing to tell you that this coat has been in the works for nearly two years! Whoops! I took advantage of the break between the fall and spring semesters to dig out this UFO and sew it up, and wow, I’m so pumped that I did! It’s been a soul-crushing month/year/you name it, so it was nice to have a project to force myself to work on instead of obsessively reading news all day every day.

Grainline Studio Cascade Duffle Coat | Ginger Makes

Pattern:

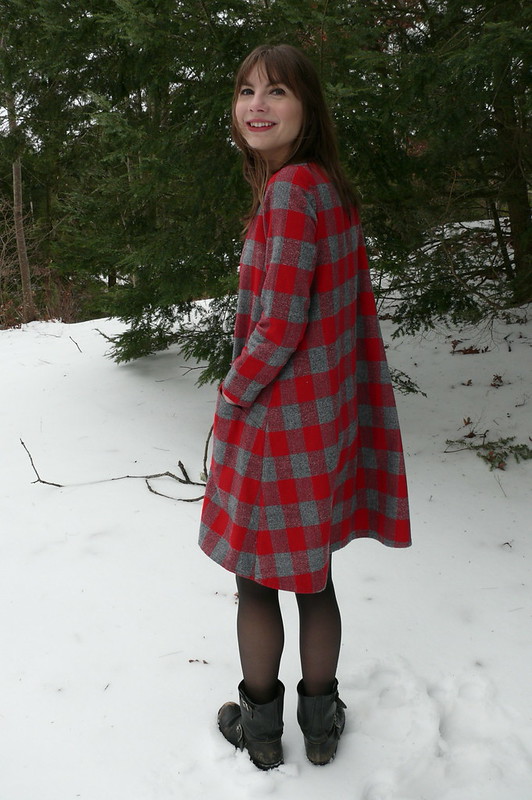
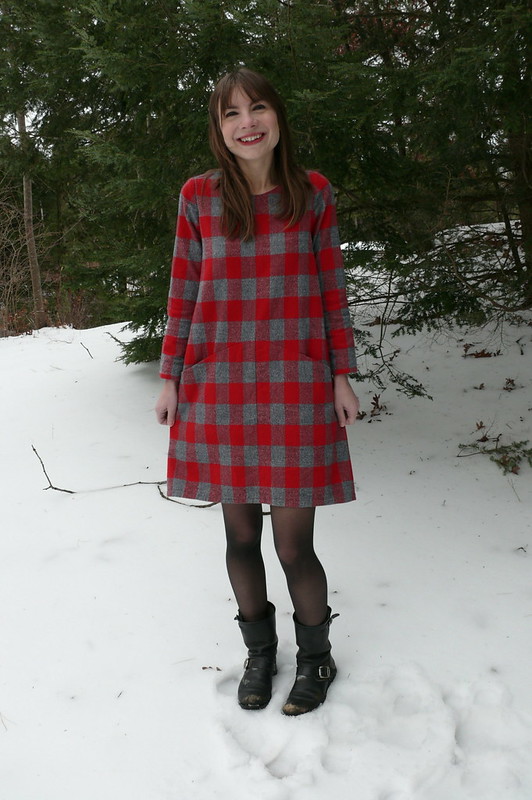
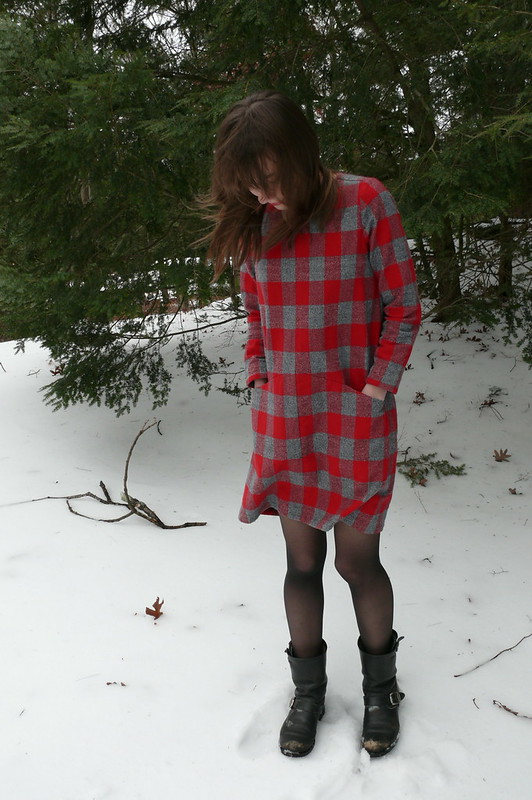
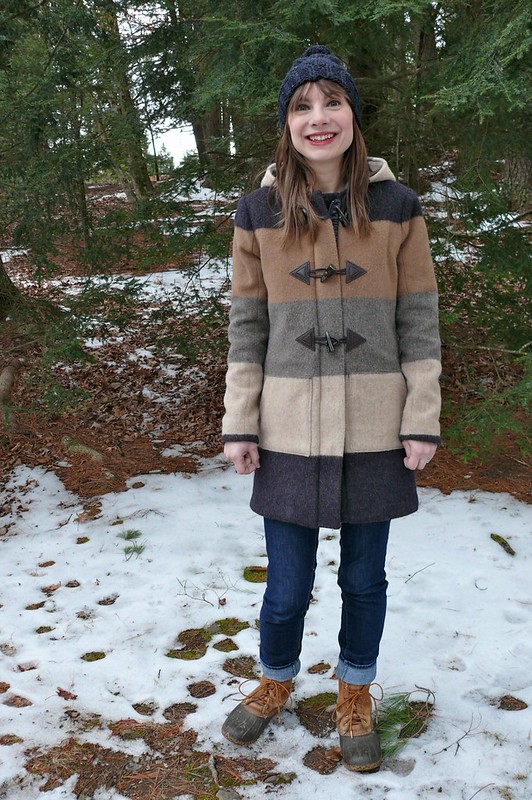
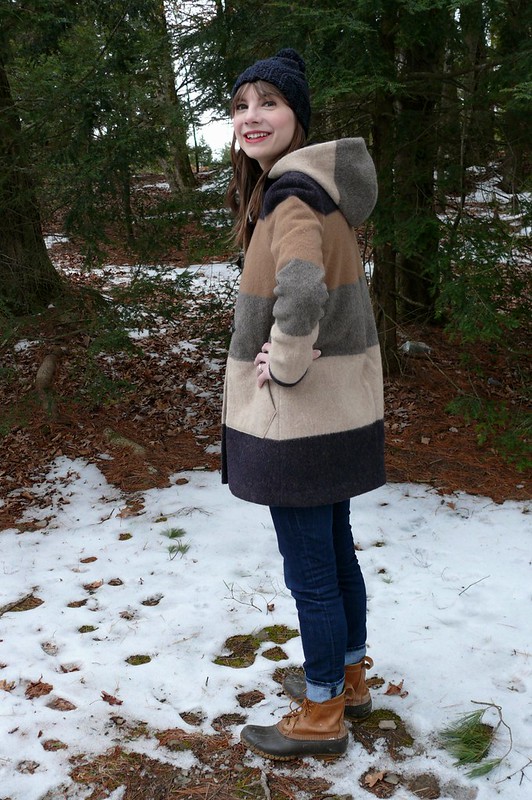
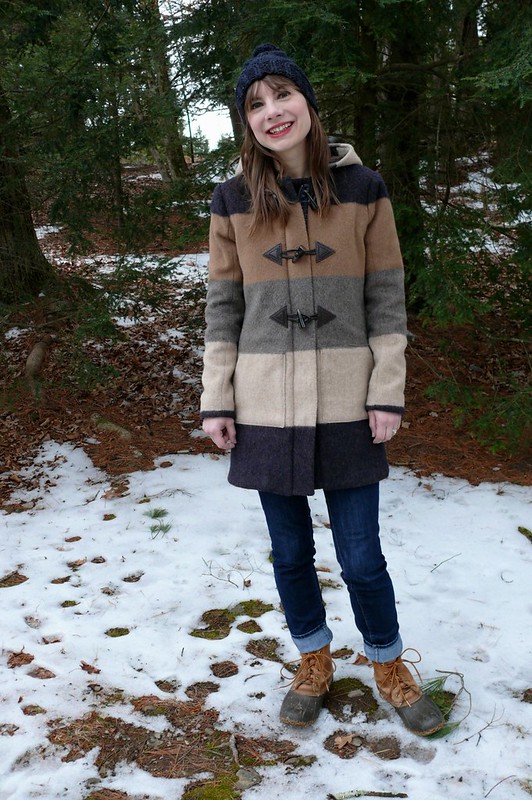
This is the Grainline Studio Cascade Duffle Coat, view B. I snapped up the pattern as soon as it was released, but this was in late winter 2015 and I tucked it away, planning to make it in the fall when it was seasonally-appropriate to make it and wear it right away. Last January I got motivated to start this coat, so I steamed the fabric, cut out all the pieces, fused everything, and then… got distracted by a big costuming project with a looming deadline (also a coat! at least it was on theme!) and stuffed it into my cedar chest, where it sat for ages, until I had to pack it up to move. I finally pulled it out a few weeks ago, nearly a year after I’d cut everything out!

A note to PDF users: this might not be super fun for you. Uncharacteristically, I bought a hard copy of the pattern- I just couldn’t face the thought of printing and taping that many sheets of paper! I was so glad I did, because life is just too short to spend it all putting together a pattern orrrrr tracing (I admit it- I was saucy and cut the pattern out without tracing… I REALLLLLLY hate tracing).

Grainline Studio Cascade Duffle Coat | Ginger Makes

Supplies:

The fabric I used is a wool coating from Mood Fabrics NYC that I bought ages ago, intending to use it to make the Named Yona Wrap Coat. I stalled on that project when I couldn’t think of a way to match the stripes nicely across a two-piece raglan sleeve. When the Cascade pattern was released, I was so pumped that I hadn’t used this fabric for anything else! I really love the combination of colors in this coat- navy, camel, cream, and grey. I can wear it with so many different things in my closet!

Grainline Studio Cascade Duffle Coat | Ginger Makes

I used this sunback lining from B&J Fabrics (I’m pretty certain it’s this exact one, although I bought it in store instead of online). Sunback is sometimes called “kasha”; it’s a flannel-backed satin, so it’s smooth and slippery like lining fabric on one side, and has a brushed nap on the other. This particular type is 51% acetate and 49% cotton. I’m partial to it for coats as it adds some extra warmth.

For me, personally, sunback isn’t enough for a winter coat, so I also interlined it using lambswool from Steinlauf & Stoller. I just used a single layer (it’s sold in a sort of double layer, so you could easily cut out double layers if you were so inclined). Steinlauf & Stoller doesn’t sell online, but you can call them and order over the phone if you can’t find lambswool locally.

I used my usual coat interfacing, Pro-Weft Supreme Medium-Weight from Fashion Sewing Supply.

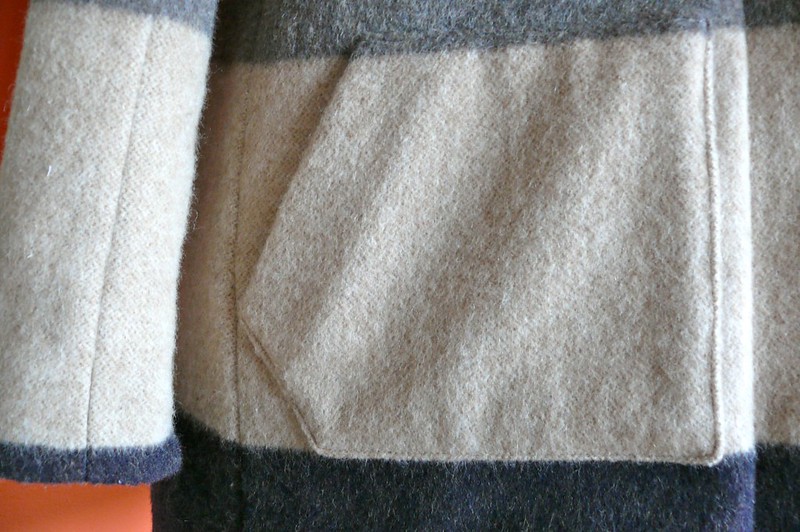
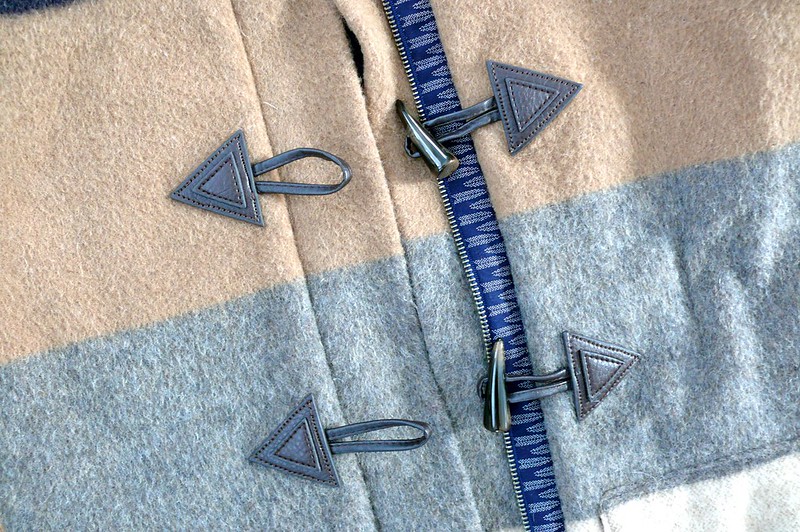
For the coat trimmings, I used a YKK separating zipper from my favorite zipper source in the Garment District, SIL Thread. I bought toggles from Pacific Trimming. The pattern includes templates if you want to cut your own leather/faux leather and make toggles yourself, but that wasn’t something I wanted to get involved with at all! For the zipper bands, I used one of my favorite Japanese cottons from my shop for a little peep of print whenever my coat is open. And I lined my pockets with bits of flannel leftover from one of my favorite Archer buttondowns. 🙂

Grainline Studio Cascade Duffle Coat | Ginger Makes

Sizing:

I cut out a size 4, which is my usual Grainline size (my hips fall into a smaller size on their chart, but I don’t mind some extra wearing ease for a coat). I didn’t want to make a muslin, since it’s kind of pointless to do that unless you’ve got a heavier-weight fabric that’s similar to coating. Instead, I just measured the flat pattern pieces and compared those measurements to another coat in my closet. I was under the impression that I’d done my usual 1/2″ narrow shoulder adjustment, buuuut, upon further review, I didn’t. That’s one drawback to sewing up a project a year after cutting it out- you can have a little confusion! 😀 My only sizing adjustment was to lengthen the sleeves by 1/2″. It probably wasn’t necessary, but too-short sleeves drive me CRAZY, so it seemed like the right thing to do.

Grainline Studio Cascade Duffle Coat | Ginger Makes

Mods:

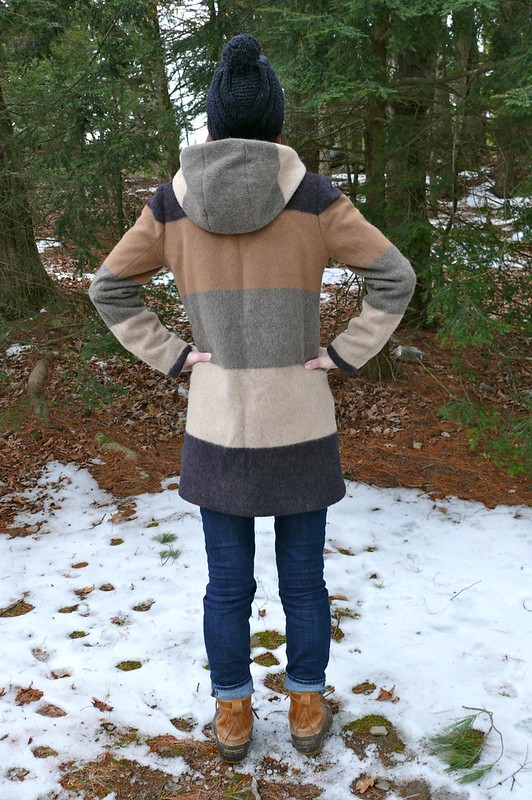
I needed to make some pattern alterations to be able to use this wide stripe efficiently. The original pattern has a yoke and a low waist seam, but I combined these three pattern pieces so that I could cut out the coat back and fronts as just one piece. It would have been a real pain in the neck to try to balance the stripes across three pattern pieces, and it would have sucked up way too much fabric. I cheated a bit and cut the center hood piece on the cross grain so that it’s just solid grey- I didn’t want to have too much stripe chaos going on back there!

Grainline Studio Cascade Duffle Coat | Ginger Makes

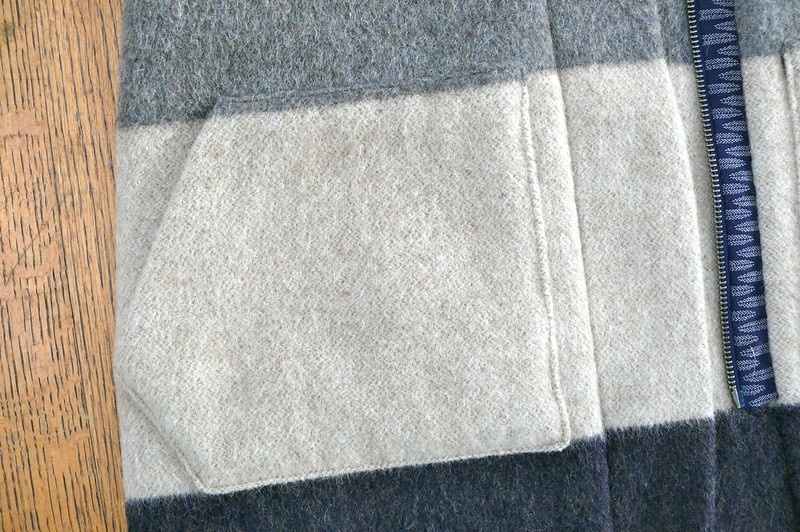
Another modification I made was to draft new pockets. I really don’t like standard patch pockets! I put them on my first Gerard coat, as the pattern instructed, but they’re annoying to put your hands into and I really use my pockets since I have a pretty long walk to and from the subway. My original thought was to swap the patch pockets out for welt pockets, but when I started to look at images of duffle coats for inspiration, they ALL had patch pockets. I thought the coat might look kind of naked or weird with welt pockets, so I took inspiration from the kangaroo pockets that you usually see on hooded sweatshirts and drafted something similar to those, with a triangular angle to it to slightly mimic the toggles that I used. I’m really happy with the final pockets! They’re really comfortable to use, they’re super warm, since they’re flannel-lined, and they have room to jam in a pair of fingerless gloves, keys, and my phone. I’m not gonna lie, though, it was a total brain-bender to figure out how to draft a pocket piece with a self-facing, and a complementing lining piece! My brain just doesn’t work that way, so I had to mock up pieces with paper and fold them until I could figure out how to do it.

Grainline Studio Cascade Duffle Coat | Ginger Makes

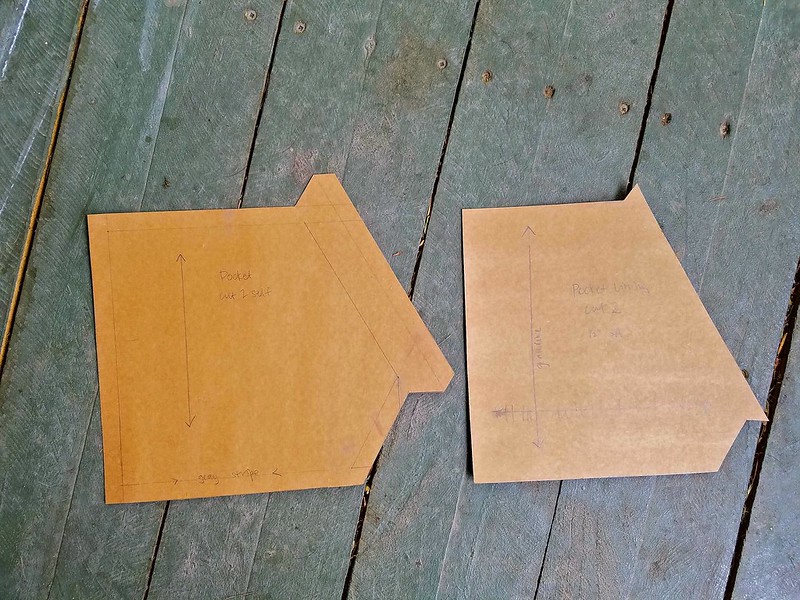
The final change I made to the pattern was the position of the pockets. They are meant to sit lower down, about 1/3 on the cream stripe and 2/3 on the bottom navy stripe. Unfortunately, I didn’t have enough fabric left to cut the pockets that way and match the stripes. Not matching wasn’t an option, so instead I opted to position them higher and honestly, it doesn’t feel weird to have them sit higher. It feels comfortable, so it’s all good!

Grainline Studio Cascade Duffle Coat | Ginger Makes

Tips & Techniques:

As I mentioned briefly above, I interlined the coat with lambswool. I referenced my favorite tailoring book, The Complete Book of Tailoring, (Amazon, but not an affiliate link) by everyone’s favorite sassy seamstress, Adele P. Margolis. If you’re into classic tailoring, I definitely recommend this book- it’s out of print, but you can pick up used copies for less than $20. I followed her directions for inserting each piece individually by hand and catch-stitching it to the very edge of the pressed seam allowance, which makes for about the least-bulky results imaginable. It was slow, but totally worth it in the end. I used the garment pattern pieces to cut out the coat front and back, and I also cut out the upper sleeve, but after basting it in, I thought it would make my sleeves too constricting. Word of warning: the sleeves aren’t for the bicep-fabulous! They’re pretty slim-fitting, which actually looks really nice with the roomy silhouette of the coat, but if you know your way around the gym, you probably want to give yourself some extra room.

Grainline Studio Cascade Duffle Coat | Ginger Makes

The thing I dreaded the most about making this coat was stitching on the toggles. I really, really, really didn’t want to do it! It stressed me out to think about not being able to seam rip them if they didn’t go on straight. I bought an extra one, which Jen recommends, to do a dry run before sewing one on the actual coat, and I noticed that the foot sort of stuck to the exposed parts of the toggle. Jen mentioned that some people put scotch tape on their sewing feet, but she didn’t do that because she didn’t want to leave any residue. So I decided to just put tape on the toggle itself, over every area that the presser foot would touch, which worked a charm. I used my 1/8″ edgestitching foot, a leather needle, and upholstery thread (bought from Pacific Trimming… it’s not as thick or stiff as the thread we buy at my upholstery job). My stitching is really ugly and I’m definitely not going to show you a closeup, but I’ve just vowed not to look too closely at the toggles so that it won’t bug me too much. 🙂

Grainline Studio Cascade Duffle Coat | Ginger Makes

The pattern instructions for the bagged lining don’t tell you to hem the coat, but I went ahead and did a blind hem by hand for added structure and stability.

Final Thoughts:

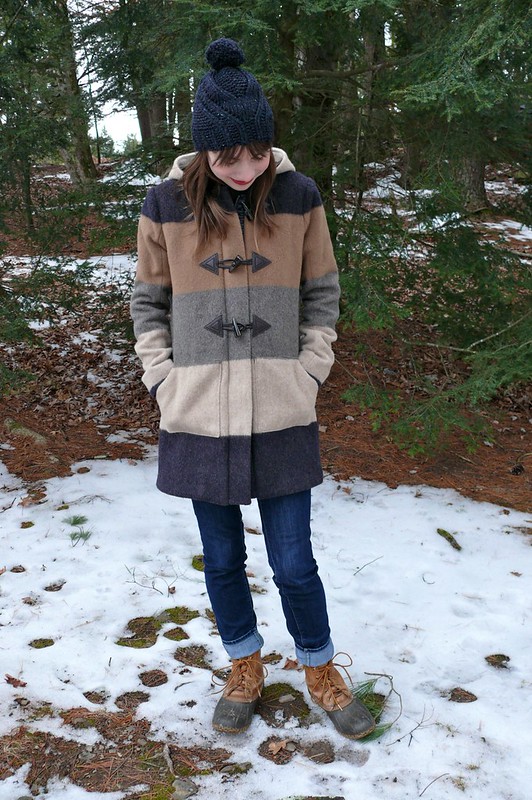
I’m super, super happy with this coat, and I’ve worn it every day since I finished it a week or so ago! It’s such a nice, classic style, and I’m really excited to wear it for years to come! I would recommend this pattern to anyone who wants to tackle a coat, and if you get stumped by the written instructions, you can always reference the photos in the sewalong hosted on the Grainline blog. I probably can’t make any more coats at this point, since my closet is fairly well stuffed with them, but this actually fills the hole left by my old peacoat, which was the perfect thing to wear in between jacket and parka weather. And I can’t tell you how satisfying it is to turn a UFO into a garment! I felt so productive getting this out of a bag and into my closet!

Grainline Studio Cascade Duffle Coat | Ginger Makes

Hat!

In case you’re curious, the hat I’m wearing in these pics is my favorite cold weather hat, the Fidra pattern by Gudrun Johnston. It’s knit up in bulky Brooklyn Tweed Quarry (colorway: Lazulite), so it’s both a fast knit and really warm for bitter days. I made it about a year ago, and I’m still loving it!

Grainline Studio Cascade Duffle Coat | Ginger Makes

OK, friends, what have you been making these days? Anybody obsessed with coat making? Planning your first attempt at one? Do tell! As for me, it’s back to school now, so this is probably my last big/fun project for some time! Boooooo! 😦

Grainline Studio Farrow Dress

Grainline Studio Farrow Dress | Ginger Makes

Hi, guys! Hope you are all well! I’m really excited you to show you my new (by which I mean “month-old” dress) today! I haven’t been good at keeping up with blogging over the last year or so, but I didn’t want this dress to have the same fate as my beloved by never-blogged (or even Instagrammed, WHAT?!) Colfax dress and two Inari dresses (in case I never do blog them, know that I love both patterns and the end results quickly shot up the list to become most-worn garments).

Grainline Studio Farrow Dress | Ginger Makes

This dress felt like a monumental achievement- I’ve wanted, for maybe 5 years now, to make a special Christmas dress, but every year I get too close to the holiday and run out of time. But when my semester ended a week before Christmas, I dropped everything and got to work on this dress! I’m so pleased that I had something fun and festive to wear on the holiday, but that it doesn’t seem too Christmas-y to wear all winter long.

Grainline Studio Farrow Dress | Ginger Makes

This pattern is the Grainline Studio Farrow dress, which I find really cute and versatile. I really liked sewing it up- the pockets are constructed in a super clever way that was really satisfying to work through. The pattern pieces for the dress front look really untraditional, but they’re fun to stitch up. I made my usual 1/2″ narrow shoulder alteration, but otherwise sewed it up as is. For the next go-round I’d lengthen the sleeves just a bit, which is something I frequently do.

Grainline Studio Farrow Dress | Ginger Makes

What WASN’T fun was sewing this dress up in plaid. Ahahahahaha… I was sewing on a deadline, so, obviously, the best thing to do was to use plaid for something with a center front seam and pockets sewn into a waist seam. Ooh boy… cutting this out took forever, and pinning it, and stitching it super slowly with my walking foot. OK, the whole thing was super slow! I matched the pieces for the dress front first, but then I started to get stressed about running out of fabric, so I eliminated the waist seam on the back pieces to conserve fabric and time.

Grainline Studio Farrow Dress | Ginger Makes

The fabric is this Robert Kaufman Mammoth Flannel (Amazon affiliate link). I was digging around in my stash for something suitable in a sufficient quantity for this pattern, but when I had nothing, it dawned on me that I could use an Amazon gift card for fabric! It was really hard to decide which plaid to use, but I’m glad that I went with this one in the end. I really like the fabric- it’s very thick and squishy, with crepe-like twisted yarns that give it a nice textured feel. It’s very warm and nice, which I appreciate in a winter dress. It feels thicker to me than normal flannel, so keep that in mind if you are going to make something with lots of layers of fabric. I had to grade the seams really aggressively at some points, like where the center front seam meets the pockets, to keep things from getting too lumpy.

Grainline Studio Farrow Dress | Ginger Makes

Overall, I’m really happy with this dress. It’s cozy and casual, but I can also imagine making a dressier version out of silk or wool crepe. Make one!

Grainline Studio Farrow Dress | Ginger Makes

The perils of shooting photos in the wind! 🙂

Book Report, Special Holiday Gift Edition: Custom Socks

Hi, guys! I hope you are all doing well! I was just pondering how much selfless crafting I can get done before the holidays arrive when I realized that I hadn’t reviewed this book yet! The timing seems perfect to talk about a book that makes gift giving easier, so here goes. 🙂

Custom Socks book review | Ginger Makes

Custom Socks: Knit to Fit Your Feet by Kate Atherley (Amazon affiliate link here; Indiebound here) is by far the knitting book I’ve used most in my life. I asked for it for my birthday last year, so I’ve had it for just over a year, and I’ve used it to make six pairs of socks for other people (with a seventh pair on my needles right now).

Custom Socks book review | Ginger Makes

Marpleridge

The book contains 14 patterns, including a basic toe-up sock, a top-down sock, and a ribbed sock. The not-so-basic sock patterns are all really lovely and cool, and Kate includes instructions for knitting each pattern both top-down and toe-up, so you can pick your favorite (or even knit one each way!). So far I’ve made the basic ribbed socks three times (in three different sizes, for three different people), the plain top down socks twice, and the Marpleridge socks once. I want to try each one of the other patterns in the book, but particularly Carpita, Harcourt, and Man of Aran.

Custom Socks book review | Ginger Makes

Carpita

While I like the patterns in the book, its real genius is that it has really simplified making socks in any size with any yarn. The book includes a BOATLOAD of charts that makes this easy- for example, if you know the finished circumference of the sock that you’d like to make, you can look up exactly how many stitches to cast on, how many heel stitches to separate out and how many heel rows to knit, how many stitches to for your heel turn and gussets, and the when and how many toe stitches to decrease depending on the gauge of your yarn. She includes crunches these numbers for sock circumferences from 5″ to 10.5″, at gauges from 4 stitches per inch to 9. Could you sit down and crunch these numbers yourself? Yes, maybe, and no, depending on how advanced your knitting skills are and how good at math you are. As a so-so knitter and a terrible mathematician, I am glad to be able to refer to the charts! You just jot down all the numbers that you need and plug them into the patterns in the book- it’s easy as can be!

Custom Socks book review | Ginger Makes

There are lots of tips for solving sock problems (ha! sock problems! are those really even problems?) that go way over my head, for example, how to do special heel flap decreases to keep your gusset stitches even when you’re knitting colorwork. I’m not sure if I would even know when to use this! But the nice thing about this book is that it offers lots to more advanced knitters, which is not something that every book can do. I also appreciate that Kate includes an entire chapter on fitting what she calls “non-average” feet. This is in-depth knowledge that isn’t easily available online, including things like what to do if your foot circumference is really different from your ankle/leg circumference, and how to account for things like diabetes and other special medical needs. This feels really inclusive and helpful– after all, isn’t it more likely that someone with “non-average” feet might be making their own socks?

Custom Socks book review | Ginger Makes

My favorite use for this book, though, is for gift giving. Kate includes charts that give the average foot and sock circumference, as well as the average foot and finished sock length, for each shoe size (men’s, women’s, and even children’s). So I’ve been able to successfully make socks that fit really well for my dad, my sisters, my brother-in-law, my mom, and Blake, just by plugging their shoe sizes into the chart in this book. The first pair that I made using this technique was a pair of basic ribbed socks for my dad… I held my breath when he tried them on, but they fit like a glove sock! I’ve also used these charts to adapt other sock patterns for gift giving, too- I just altered the stitch and row counts that were included in whatever pattern I was using to match the numbers from the book. This is particularly helpful for simple patterns that only give you one size and just say “knit to desired length” or something like that. I haven’t had a pair not fit the recipient really well yet!

Custom Socks book review | Ginger Makes

All in all, I love this book, if that isn’t clear, and think it would be a great addition to your personal or neighborhood library. It’s made me much more confident that the socks I knit for other people will fit, and as a result, be worn! Now, tell me, are you doing any holiday knitting? What do you like to knit for other people? Any favorite items or patterns? Do tell!

Custom Socks book review | Ginger Makes

Harcourt

Slow Fashion October and Talking Textile Development & Marketing

It’s the first week of Slow Fashion October, and the theme is “Introductions”. I often feel like my participation in online projects like #sewphotohop or things like that would be over the top because I’m already over-sharing online basically 24/7, but  it occurred to me that maybe this would be a good opportunity to introduce you guys to the program that I’m enrolled in at FIT in case anyone else might be interested. My interest in making turned into an interest in slow fashion, and from there, I was so intrigued with where and how textiles are made that I, a passionate non-academic, non-student type, got sucked back into school, something I NEVER wanted to do! But understanding textile processes and wanting to get involved in that world was a natural progression of my interest in slow fashion, so I thought there might be other people out there who have a similar interest.

20160917_181728

I am doing a one-year AAS degree in textile development and marketing. The one-year programs at FIT are for people who already have some college, or a degree in another area– you take the major requirements of the regular two-year degree, but none of the general ed requirements (no freshman writing seminar, yay!). They’re geared towards older students who work and are looking for a career change or trying to learn more skills for the field they’re in, and there are a few kids from other schools who are treating the program as a study abroad. Of course, there are some 18 year-olds mixed in, and almost nothing makes me feel my age like being around people who are 15 years younger!

When I was considering going back to school, I overlooked this program for quite some time because it falls under the business and technology school umbrella. Folks, I’m not a business type! I’m a Creative Person! I don’t want to sell things or make PowerPoint presentations! But once I really examined the program, I realized that it was basically everything I wanted to learn- the geeky, technical elements of what goes into creating great textiles. It’s not a design degree (although you get to do a little bit of that), but is instead focused on fibers, weaves, performance, and end use. The first year’s curriculum includes the following eight classes:

1.) Fundamentals of Textiles: This is an intro class to textiles, and it gives you a good basis of knowledge about fibers, production processes, finishing, and applications. I took this class a little over a year ago when I was first considering the program, and it totally hooked me! I would totally recommend it to anyone in the NY area who wants to know a bit more about how different fibers behave, what they are, and how they’re made. They offer it in evenings, and anyone can take it!

2.) Introduction to the Fashion Industry: This class is the basic over to fashion merchandising that all the fashion business management majors take. It covers each step of the process of how a designer’s sketch becomes a product and lands on shelves in retail stores. There’s a big focus on trend forecasting and lots of case studies of fads, trends, successes, and flops. I took this last year as an evening class as it’s also open to anyone, and I think just about everyone in my class was a non-degree student who just wanted to know more about how the fashion business works.

3.) The History of Textile Trade and Technology: This is an interesting one! It feels like a combination anthropology and art history class. We’re studying the way that different technologies for textile creation popped up independently all over the world, and the different forces that shaped and moved textile traditions from one part of the world to others (think: the Silk Road, the Crusades, Viking sea travel).

4.) Color Creation and Sustainable Applications: This is a hands’-on class that is surprisingly science-y. We study the science of color and light, and the various systems for measuring and describing color. A large part of our homework thus far has been painting- mixing different hues, shades, and values, and just generally getting comfortable understanding how different colors work together and how they’re created. We’ve been practicing pitching through exercises like bringing in a printed fabric, and digging through the massive departmental swatch library to create alternate colorways of the print using similar values, but different hues. It’s harder than it sounds! This class is a requirement for the Ethics & Sustainability minor, so my classmates are very interesting and cool.

5.) Fabrics for Interiors: This class is focused on home dec textiles, and the teacher is focused on helping us think through which textiles are best for different applications as well as considering the design and trend perspective, not just technical aspects. Interiors fabrics are so much more varied than I initially thought- when you think about it, they’re not just in houses and hotels, but also in restaurants, cars, boats, medical facilities, campers, well, almost anything!

6.) Apparel and Home Textile Products Manufacturing: This class details the processes by which finished products are designed, sourced, costed, and produced. It’s taught by a garment factory owner and is also really built around case studies and thinking about hypothetical and real-life situations.

7.) Excel for Business: spreadsheets. Lots of spreadsheets. The less said the better!

8.) CAD and Design Fundamentals for Printed Textiles: This one really scared me before I got into the classroom! But CAD in the fashion business just means any kind of computer-aided drafting (so, Photoshop and Illustrator), not AutoCAD, phew! We create print collections, starting with a concept, moving on to a digital storyboard, and finally making multiple prints and tiling them into repeats before presenting them for critiques. We presented our first collections this week, and it was an experience that was the kind of hard where you really have to push yourself, but you can feel yourself growing! It’s been a while since I’ve really felt like I was totally in over my head, but it’s been good, in a way, although there have definitely been moments that were so overwhelming that I was tearing up in the library!

The really great thing about the program is that all the classes are taught by people that work in the industry and are really passionate about what they’re teaching. There’s also a huge interest in sustainability, whether it’s about cleaner processes, respect for traditional techniques, or developing friendlier fibers. My professors have seen firsthand the environmental impact of fast fashion and the factory conditions that accompany it, so it’s been hugely enlightening. Also, the efforts of the department to become more environmentally friendly are really laudable and super interesting- for example, students in the program instituted a muslin recycling program to the school to compost and reuse the yards and yards and yards that the fashion design department goes through every semester! And there’s even a rooftop natural dye garden– how cool is that?? Both of those programs were recent winners of the Clinton Global Initiative University program, so hopefully they’ll be introduced in other fashion schools. More recycling, please!

If you have any questions about the program, feel free to reach out to me! In the meantime, are you participating in Slow Fashion October?

Book Report: Vintage Details

Hello friends! Hope you are all well! Are any of you struck with the back-to-school feeling over the last few weeks? I am every year, but this year I’ve actually returned back to school full-time, and my first research assignment sent me into a flurry of excitement as I dug through the library for information about ancient weaving techniques! As I looked through books of textile research, I was reminded that I’d received a review copy of this book some time ago and had totally forgotten to share it with you in the hustle and bustle of packing and moving.

Vintage Details review | Ginger Makes

Vintage Details: A Fashion Sourcebook (Amazon affiliate link here; Indiebound link here) was sent to me by Laurence King Publishing. It’s a bit different from some of the books I’ve received from them- it doesn’t contain any sewing patterns, but it’s not really a textbook, either. What it is, essentially, is a 350-page visual dissection of 20th-century vintage clothing.

Vintage Details review | Ginger Makes

The book begins with a photo index of all the garments that appear in the book. There’s a shot of the front and the back, and a little blurb about the era, fabrication, and country of origin.

Vintage Details Review | Ginger Makes

I chose to feature one of my favorite outfits in this blog post, a linen coat and dress ensemble worn in England around 1927. As you can see in the photo, the page numbers for the detail shots are listed next to the original garment photos so if a garment piques your interest, you can easily find closeups.

Vintage Details Review | Ginger Makes

After the index, detail shots of the garments are arranged by feature (for example, necklines, as seen above), so you can browse by section and look for inspiration all in one place.

Vintage Details Review | Ginger Makes

Isn’t it wild that these motifs are printed? I wonder how common that was in 1927!

Vintage Details review | Ginger Makes

I really enjoy these detailed photographs- it’s a bit like visiting a costume exhibit in a museum, but without feeling too nervous that a guard will yell at you for getting too close to the garments! (Is it just me or are you also struck with a nearly impossible-to-curb desire to touch clothes in a museum???)

Vintage Details Review | Ginger Makes

This dress may be nearly 90 years old, but I could totally wear this today! It’s so timeless!

Vintage Details review | Ginger Makes

Look at the beautiful shape of that sleeve! Drool! The book includes sections on necklines, collars, sleeves, pockets, fastenings & buttonholes, hems, darts, stitching & fitting devices, pleats, frills & flounces, embellishment, surface, and construction.

Vintage Details Review | Ginger Makes

To summarize, if you are a person who loves to look at photos of cool vintage clothes, you’ll love this book. If you’re less inspired by photos and more into line drawings or touching physical objects, you probably won’t. But it seems like a book that would be really inspiring to those of you who enjoy hacking patterns and including unique details- there are plenty of things here to get your creative juices flowing! (I’m still daydreaming about a cream-colored jacket with a bias-cut striped collar… I forgot to take a photo of it and I’ve mislaid my camera, oops!). This also seems like a great book to request for your local library.

Here are a few more details from different garments that really intrigued me:

Vintage Details Review | Ginger Makes

If ever a sleeve was edible, surely this is it!! It is PERFECT.

Vintage Details review | Ginger Makes

I mean… that’s some mod goodness right there! Yes, yes, and yes!

Vintage Details Review | Ginger Makes

I basically want this pocket on ALL of my clothes.

Anybody seen any inspiring vintage clothing lately? Which details stood out to you?

Dude Knitting: Brooklyn Tweed Bradbury!

Hi, guys! Ever have an unfinished project that just haunts you? Every time you get the itch to start something new, you feel a twinge of guilt? Well, this sweater was one of those, so I’m really excited to finally be done with it!

Now, I love to knit, but I haven’t done much of it for Blake. He has very particular taste and if something doesn’t meet his specifications, he just won’t wear it (see: the scarf I crocheted for him right after college… I don’t think he wore it even once!). But when I saw the Bradbury pullover in the Brooklyn Tweed Men’s Volume 2 collection, I knew that he would like it. No cables, no collars, no textures- just plain stripes! That’s his jam. 🙂

Brooklyn Tweed Bradbury Pullover | Ginger Makes

Bradbury is designed by Julie Hoover, and the suggested yarn is Brooklyn Tweed LOFT. I had never used a Brooklyn Tweed yarn before, but I decided to splurge on it for Blake’s sweater since I’d heard that it was very light and airy. I saved up my pennies and got Man Friend approval for a colorway combo of Almanac/Sweatshirt.

The thing that I like most about Brooklyn Tweed patterns is that I always feel like I’ve learned something new by the time I’ve finished. In this case, I learned the tubular cast-on and bind-off, the sloped bind-off, and a different way to knit stripes in the flat. I have to admit, though, that when I first downloaded the PDF, it took me a few weeks to dive into the pattern because it seemed like a much more complicated project than I’d originally thought and I just didn’t want to get started!

Brooklyn Tweed Bradbury Pullover | Ginger Makes

This raglan pullover is knit flat from the bottom up and seamed, with visible raglan seams. It took me 5 months to knit it, although I didn’t knit very aggressively, just here and there as I felt like it (I cast on last May and I’ve never been much of a summer knitter, but I’d hoped to finish in time for cold weather). Then I spent a month procrastinating on seaming things up, tried a few times, failed a few times, then let it sit on my work table for, ohhhh, six months. I felt terrible every time I laid eyes on it, but I just didn’t want to try seaming it again! For some reason I couldn’t get things to line up right (I think I was picking up the wrong bar between the stitches on one side, so I kept having a different number of bars on one side than the other, if that makes sense) and that was really visible in a striped garment. Finally I decided that I HAD to finish it for Blake’s birthday at the end of May, so I gritted my teeth and just stuck with it until I was done.

Here’s where I should mention, like other knitters have, that it’s just not possible to seam with LOFT. It broke over and over, even when I twisted it to add tensile strength, so I had to buy different yarn in as close of a color match as I could (I ended up using Cascade 220 Fingering because it was the cheapest thing I could find). Honestly, this annoyed me, because I’d already spent so much on LOFT that the last thing I wanted to do was buy MORE yarn, plus, now I have an entire skein (minus a couple of yards) each of two different colors taking up room in my stash, neither of which I’m particularly excited to use for another project. Ugh!

Brooklyn Tweed Bradbury Pullover | Ginger Makes

Because I was making this for Blake and he is really picky about fit, I was really careful about checking the finished chest and sleeve measurements, and about both swatching and blocking accurately. Unfortunately, it didn’t occur to me to check the finished garment length (from neck to hem), and it was really too short for Blake. I shouldn’t have assumed that the designer’s hem length would be what we wanted… ugh! When he tried it on, it looked really stupid (actually, the length was great for me!). So, I reblocked the entire sweater aggressively and was able to gain about an inch of extra length, which isn’t perfect, but at least it’s wearable now. It annoys me a bit, though, after spending a small mint and countless hours of my life knitting a men’s sweater in flat stockinette in a fingering-weight yarn!! But I’m not about to frog the whole sweater just to make it longer so it’s going to stay as it is (that’s the downside to knitting bottom-up… trying it on as you go just isn’t an option). I also feel like I see some pulling at the armscyes in these photos, but I didn’t notice it when he was wearing it so maybe I’m just being paranoid!

At the end of the day, Blake is really happy with the sweater and not miserable and sad as these photos might suggest (at one point in the photo session I asked him if he thought he was smiling, ha!). Frankly, I’m just happy to have this project off my work table and in his closet!

Brooklyn Tweed Bradbury Pullover | Ginger Makes

So tell me, have you ever knit something for any of the men in your lives? How did it go? Any success stories or project recommendations?

Finally, one last order of business- the winner of the Wool and the Gang giveaway, as chosen by random.org, is… Lee! Give me a shout and I’ll get the kit off to you!